I don’t know about you, but I love the look of the aged wooden signs that seem to be popping up everywhere.
While I would love to own an original, with all of the vintage-y charm that comes with it, I settled for making one myself.
This was easy, even for a non-artist like myself, and the possibilities are endless-I already have another one in mind that I want to create for my family room!

Materials Needed:
wood
wood
acrylic paint
stain
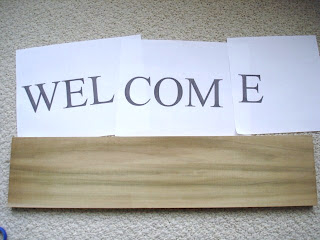
Step 1: Head to your computer and print out the wording for your sign, in the exact size and font that you want for your finished product. I printed out on the “light” mode to save a bit of ink. Tape letters down to your wood.
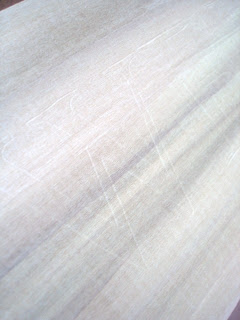
 Step 2: Using a pencil, press down really hard to outline your letters. Imprint will be visible, but barely.
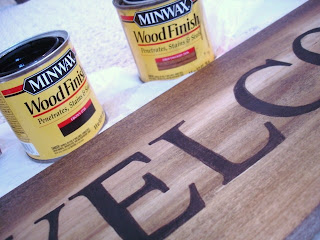
Step 3: Trace letters with a black sharpie (see? obviously you are dealing with a real professional here). Then fill in with some black acrylic paint using a small paintbrush.


Step 4: Now for the fun part. Take some stain and, using a wet paper towel, apply to your sign. Practice on the back first!!! Use multiple colors of stain, or just one, whatever happens to be in your garage will work fine. Then, take a sanding block and rough up the edges, sand over the words, etc. as much or as little as you want to give it an aged effect. I also used a bit of watered down white acrylic paint to lighten it up a bit and distress it further.


DONE! Isn’t she lovely? Thanks for reading my first tutorial-hope it made sense, please ask me any questions you may have if any part was unclear!
Debbie
Friday 22nd of February 2019
Do these signs need sealing with anything after stain is dry? Thanks
DIY Crafts - Dremel Projects Ideas
Sunday 7th of October 2018
[…] DIY Crafts is creative inspiration for us. Get more photo about home decor related with by looking at photos gallery at the bottom of this page. We are want to say thanks if you like to share this post to another people via your facebook, pinterest, google plus or twitter account. Right Click to save picture or tap and hold for seven second if you are using iphone or ipad. Full size is 320X240 (Link to full-size image) pixels. Source: burlapandblue.com […]
Lisa Maria
Sunday 31st of December 2017
Great tutorial, your sign looks awesome. One tip I use a carbon under my paper to trace any designs. I learned that doing tole painting years ago.
making easy money
Wednesday 18th of July 2012
Visitor recommendations...
[...]one of our visitors recently recommended the following website[...]…...
take m y a
Tuesday 26th of June 2012
Check this out...
[...] that is the end of this article. Here you’ll find some sites that we think you’ll appreciate, just click the links over[...]…...