If you’ve read this blog for any amount of time, you know that I LOVE wreaths!
Here, I’m sharing all of my favorite wreath tutorials. From felt wreaths, to paper wreaths, wreaths for holidays and seasonal wreaths, there’s something here for everyone. Use these wreaths to gussy up your front door, place on a gallery wall, or display in a dining room or kids bedroom!
This is a sponsored post written by me on behalf of A.C. Moore for IZEA. All opinions are 100% mine. Sharing two easy paper crafts with the help of A.C. Moore! Make a simple spring wreath and an adorable flower-themed gift bag. Both projects are bright, cheery and perfect for the warmer months! I LOVE …
Read More about Spring Wreath Idea with AC Moore
Looking for a fall or winter wreath to decorate your front door? Today, I’ve rounded up my favorite cool-weather wreaths to buy! As is often the case, one (small!) home project often snowballs into many more. A few weeks ago, my husband and I started a few outdoor projects, including replacing the soil in some …
Read More about Favorite Fall and Winter Wreaths to Buy
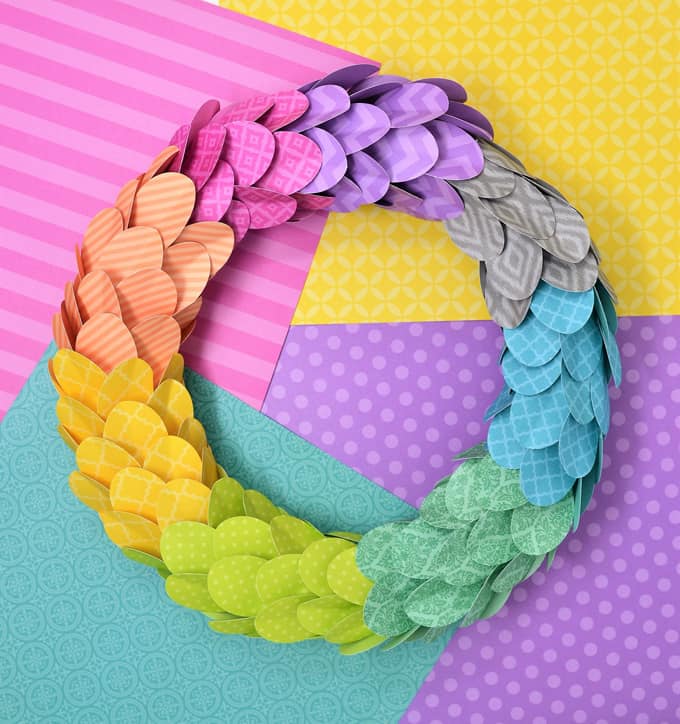
A collection of creative DIY wreaths perfect for all levels of crafters! Take an afternoon and make one of these easy wreaths today. Wreaths are one of my very favorites things to craft. They’re often inexpensive to make, and are perfect for home decor or gifts. I’ve made many wreaths in the past, and not …
Read More about Favorite DIY Wreaths You Can Make In An Afternoon
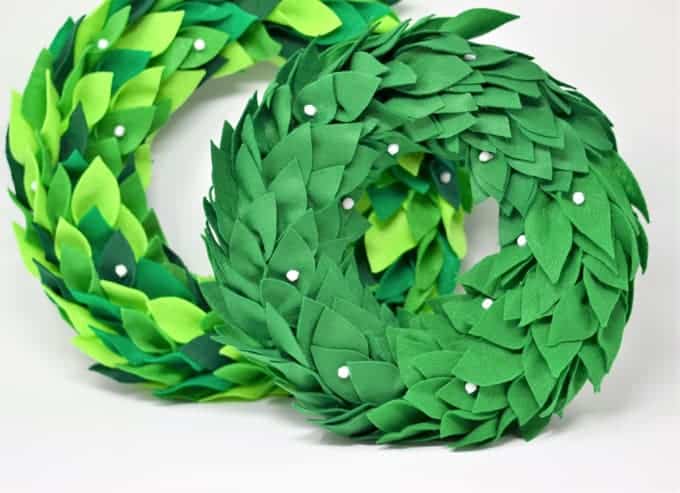
If you’ve ever wanted to know how to make a felt magnolia wreath, this tutorial is for you! Felt wreaths are inexpensive and easy to make-perfect for beginners. Before spending a hundred dollars on a magnolia wreath, try this! Make this magnolia wreath for gifts, to sell, or for your own home decor. Tutorial PLUS …
Read More about Magnolia Wreath {How to Make a DIY Felt Magnolia Wreath}
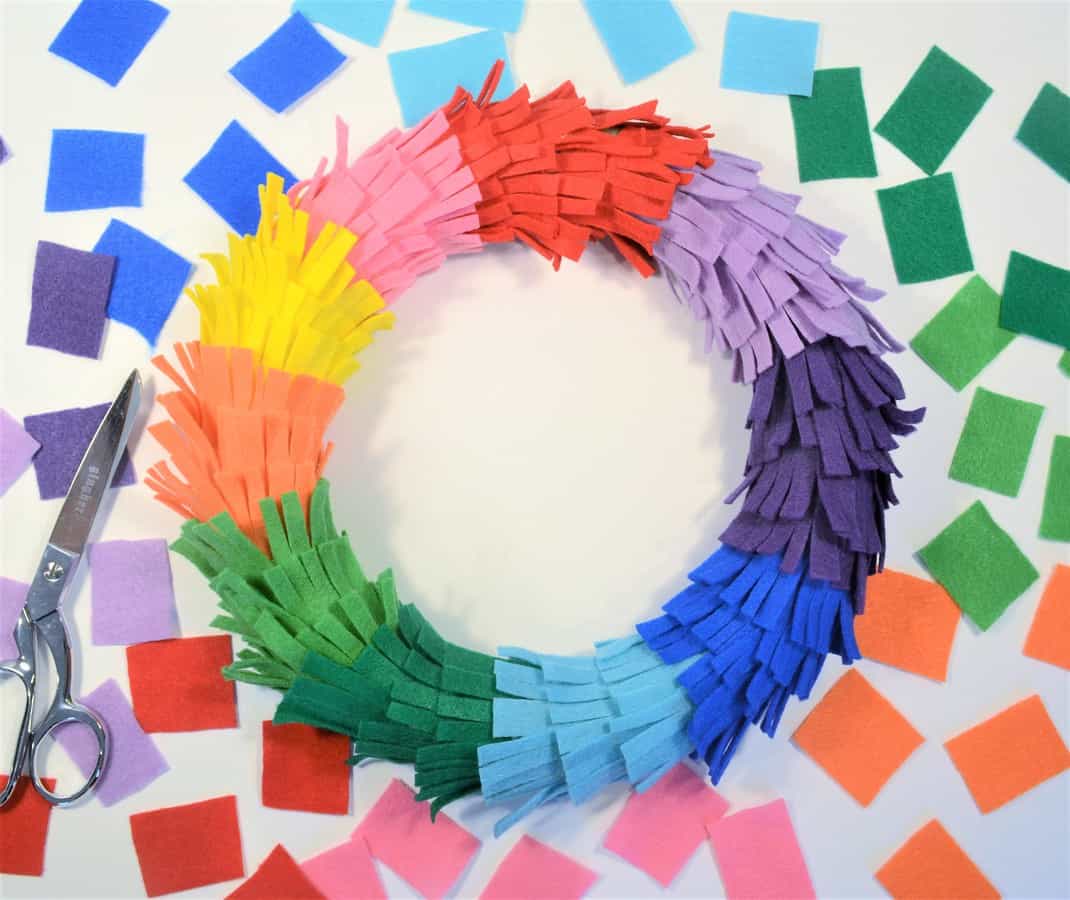
I love creating and displaying door wreaths that are a bit different than the norm. Today, I’m sharing an easy and creative rainbow fringe using felt! Make this easy wreath in any color scheme you want! This blog is no stranger to felt wreaths. This leaves and lace felt wreath was one of the first, and this …
Read More about Door Wreaths Ideas {Make a Rainbow Fringe Wreath}
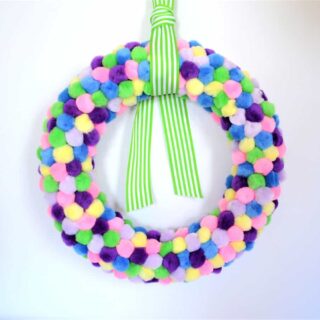
Looking for an easy spring wreath idea? This spring pom pom wreath is inexpensive and comes together quickly. Choose pom poms in any color you’d like to match your color scheme! Keep reading for the how-to… It may still be chilly outside, but this spring pom pom wreath is making me turn my sights to …
Read More about Spring Wreath Idea {Make a Pom Pom Wreath}
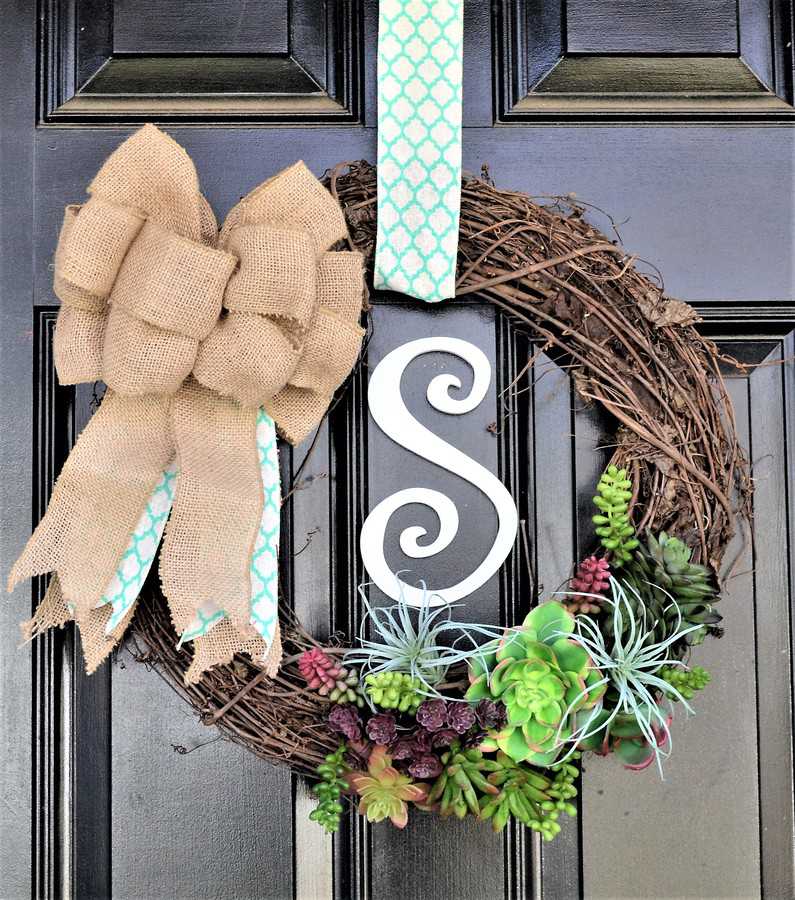
A succulent wreath is the perfect way to welcome spring to your home! This front door wreath features succulents, burlap and a wooden initial. Make this easy succulent wreath today! This is a sponsored conversation written by me on behalf of Hobby Lobby. The opinions and text are all mine. I don’t know about you, …
Read More about Succulent Wreath {How to Make a Spring Door Wreath}
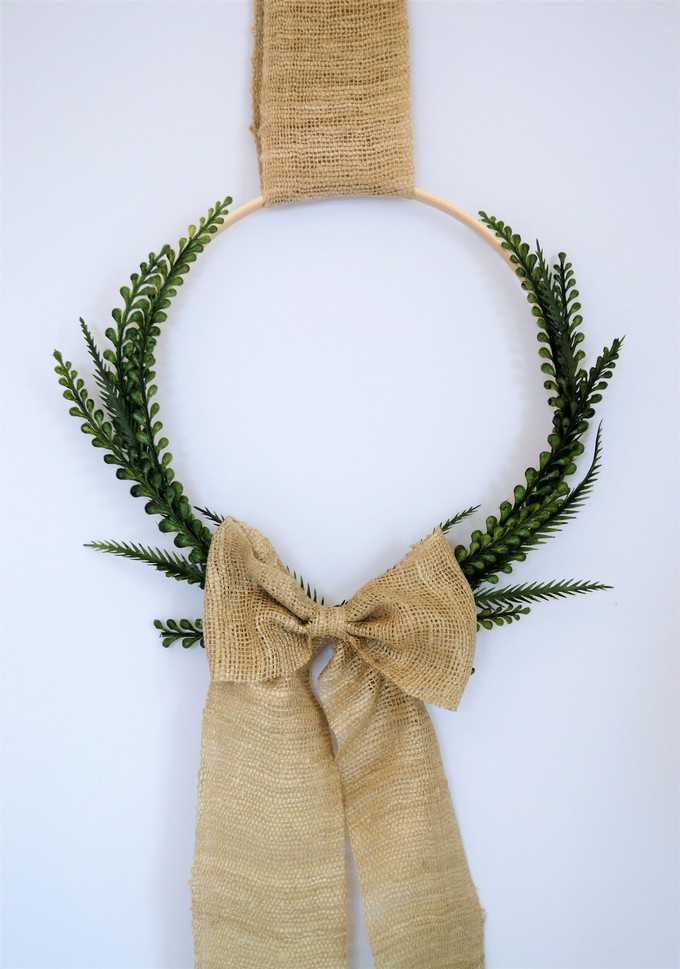
We’re big fans of easy DIY wreaths here at burlap+blue. This embroidery hoop and boxwood wreath is a nod to spring, but would easily work year-round. Use any faux greenery or fabric/ribbon you’d like to customize this easy wreath for your own home! Materials: Embroidery Hoop Faux Greenery Ribbon or Fabric for Bow Hot Glue Step …
Read More about easy spring wreath {embroidery hoop & boxwood wreath}
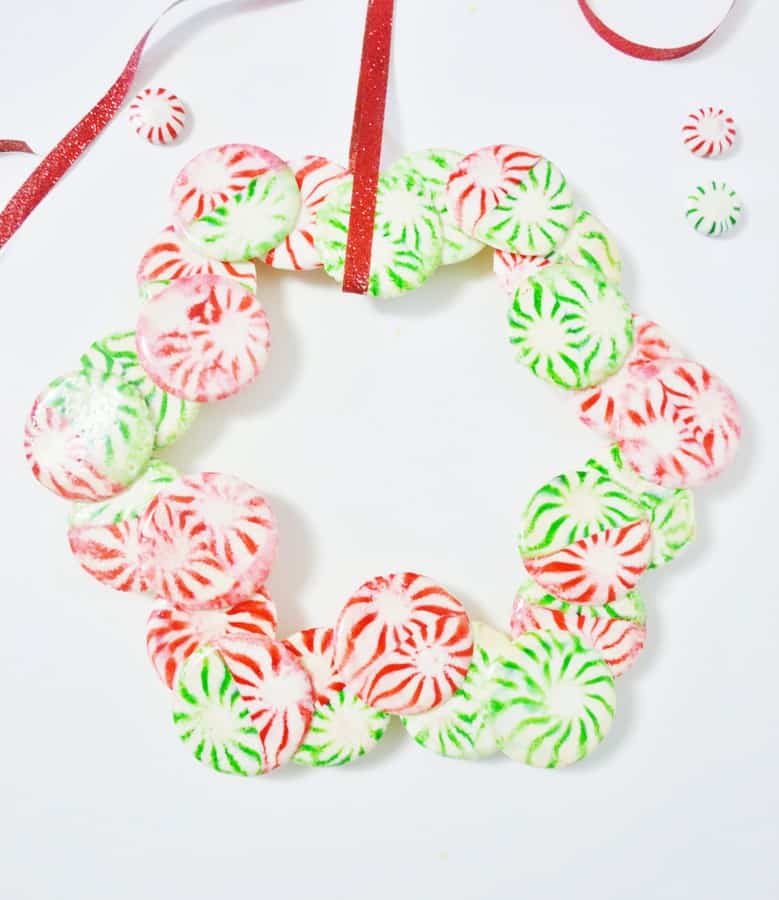
Looking for a quick, easy and creative holiday craft idea? You’re in the right place! Read on, and then stick around for more Christmas crafts and printables!! I’m not sure where I got the idea for this Starlight Mint Christmas wreath…but the fact is, this was such a fun and simple craft project. I’m using …
Read More about starlight mint christmas wreath {a tutorial}
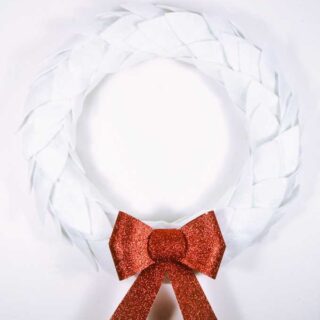
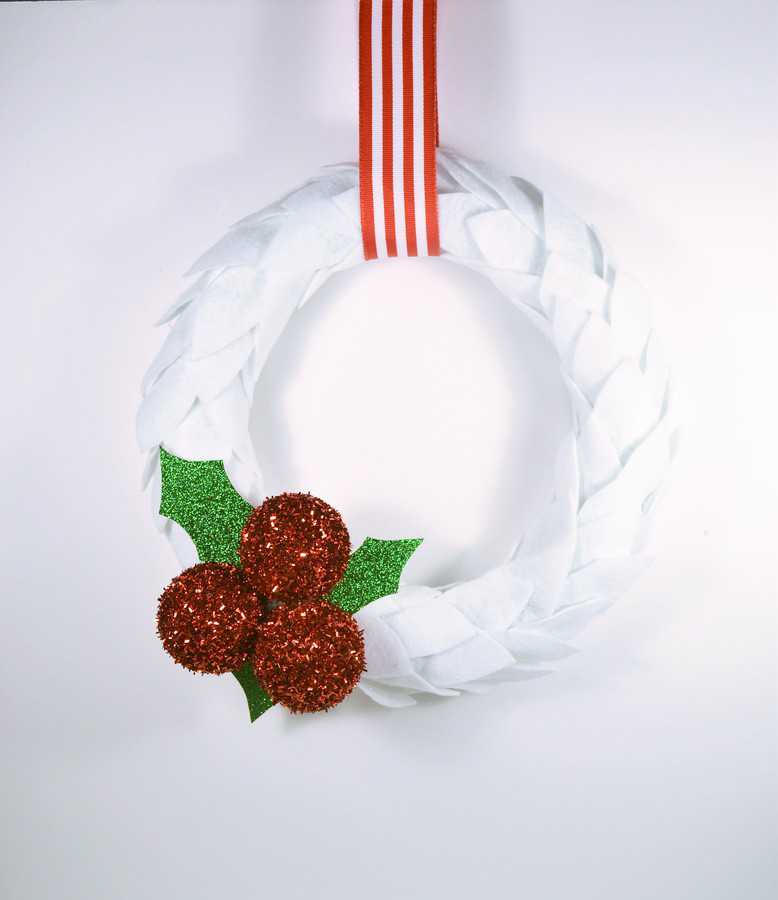
Felt is one of my favorite mediums for creative wreath-making. This DIY Christmas Wreath features white felt, plus glittered DIY holly berries for a fun and modern take on traditional holiday wreaths. Place this wreath on your front door, or inside your home as part of your holiday decor. If you don’t permanently attach the …
Read More about DIY Christmas Wreath {Felt and Holly Berries}
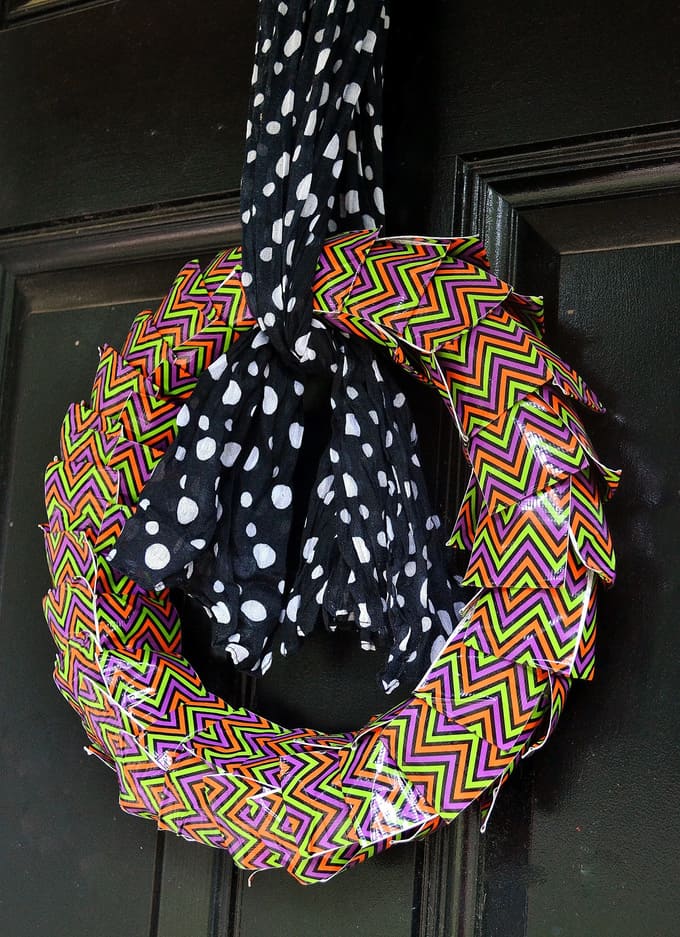
New here? Then, WELCOME! I hope you find lots of inspiration to spark your own creativity. If you like what you see, click below to check out how to become a patron for MORE good stuff + printables (even some happy mail on occasion)! I adore creating and sharing easy duct tape crafts! Today, I …
Read More about Duct Tape Crafts {Make a Halloween Wreath}